● CentOS7安装FastDFS
Boutique: CentOS7 and FastDFS build image server
brief introduction
FastDFS is an open source high-performance Distributed File System. It manages files. Its main functions include: file storage, file synchronization, file access (file upload, file download), etc. It mainly solves the problem of massive data storage, especially for small and medium-sized files (recommended range: 4KB < file)_ Size < 500MB).
FastDFS system has three roles: tracker server, storage server and client.
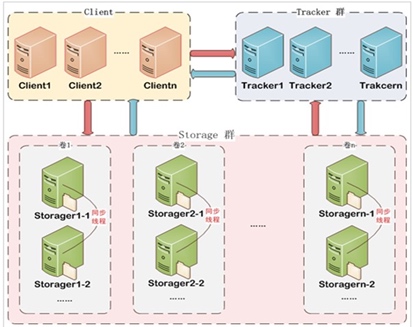
- Client: the client, as the initiator of the service request, uses TCP/IP protocol to interact with the tracker server or storage node through a proprietary interface.
- Tracker Server: coordinator of FastDFS, which plays a balanced role; it is responsible for managing all storage servers and groups. After each storage is started, it will connect tracker to inform itself of its group information and maintain periodic heartbeat. Tracker will establish a mapping table of group = = > [storage serverlist] according to the heartbeat information of storage.
- Storage Server: Storage Server, which mainly provides capacity and backup services. It is organized by group (volume, group or volume). A group contains multiple storage machines, and the data is backed up for each other. The storage space is subject to the storage with the smallest capacity in the group. Therefore, it is recommended that multiple storage in the group be configured as much as possible to avoid the waste of storage space.
Software
- CentOS7
- libfastcommon 1.0.38
- fastdfs 5.11
- nginx-1.15.2
Note: the version of the software should be consistent, otherwise there may be version incompatibility
1. Download and install libfastcommon
-
Download libfastcommon
wget https://github.com/happyfish100/libfastcommon/archive/V1.0.38.tar.gz -
Unzip file
tar -zxvf V1.0.38.tar.gz cd libfastcommon-1.0.38 -
Compile and install
./make.sh ./make.sh install -
Create soft link, because the Lib directory set by FastDFS main program is / usr/local/lib, so we need to create soft link
ln -s /usr/lib64/libfastcommon.so /usr/local/lib/libfastcommon.so
ln -s /usr/lib64/libfastcommon.so /usr/lib/libfastcommon.so
ln -s /usr/lib64/libfdfsclient.so /usr/local/lib/libfdfsclient.so
ln -s /usr/lib64/libfdfsclient.so /usr/lib/libfdfsclient.so
## 2. Download and install FastDFS
1. Download FastDFS
```shell
wget https://github.com/happyfish100/fastdfs/archive/V5.11.tar.gz
```
2. decompression
```shell
tar -zxvf V5.11.tar.gz
cd fastdfs-5.11
```
3. Compile and install
```shell
./make.sh
./make.sh install
```
4. Installation results
- The default installation directory, execute the command cd /etc/init.d to see the following:
```shell
/etc/init.d/fdfs_storaged
/etc/init.d/fdfs_tracker
```
- Configuration file: cd /etc/fdfs, file with four. sample suffixes (automatically generated fdfs template configuration file)
```shell
/etc/fdfs/client.conf.sample
/etc/fdfs/storage.conf.sample
/etc/fdfs/storage_ids.conf.sample
/etc/fdfs/tracker.conf.sample
```
- Execute the command:
```shell
ls -la /usr/bin/fdfs *
or
ll /usr/bin/fdfs *
```
and view the command script:

5. Set script soft link
The bin directory set by FastDFS service script is /usr/local/bin, but the actual command is installed under /usr/bin/. You can create a soft link from /usr/bin to / usr/local/bin
```shell
ln -s /usr/bin/fdfs_trackerd /usr/local/bin
ln -s /usr/bin/fdfs_storaged /usr/local/bin
ln -s /usr/bin/stop.sh /usr/local/bin
ln -s /usr/bin/restart.sh /usr/local/bin
```
## 3. Create the fastdfs file storage directory /home/hc/fastdfs/
Create the folder fastdfs in the /home/hc/ directory as the root directory of fastdfs data
## 4. Configure Tracker service
1. Enter the /etc/fdfs directory and copy through the cp command tracker.conf.sample , renamed as: tracker.con (delete the suffix. Sample) as an official document
```shell
cd /etc/fdfs/
cp tracker.conf.sample tracker.conf
vi tracker.conf
```
2. edit tracker.conf : vi tracker.conf , modify the relevant parameters (only need to modify: base)_ Path and http.server_port)
```shell
# Port to provide service. Default: 22122
port=22122
# Tracker stores the root path of data and log. The root directory must exist and the subdirectory will be created automatically
base_path=/home/hc/fastdfs
# http port, which needs to be the same as nginx
http.server_port=80
```
3. Start tracker (support start|stop|restart)
```shell
# Method 1:
/etc/init.d/fdfs_trackerd start
# Method 2:
service fdfs_trackerd start
```
After successful startup, the_ Create data and logs under path.

4. To view the port status, command: netstat -apn|grep fdfs

If port 22122 is listening, the Tracker service is installed successfully.
Tracker close command:
```shell
service fdfs_trackerd stop
```
5. Set Tracker startup
```shell
chkconfig fdfs_trackerd on
```
## 5. Storage service configuration
1. Enter the /etc/fdfs directory and copy the cp command storage.conf.sample , rename to storage.conf (delete. Sample) suffix as official document
```shell
cd /etc/fdfs/
cp storage.conf.sample storage.conf
vi storage.conf
```
2. Editor storage.conf , modify the relevant parameters (base_path,store_path0,tracker_server, http.server_port)
```shell
# Whether the configuration file does not take effect. false means it takes effect
disabled=false
# Specify the group (volume) this storage server is in
group_name=group1
# storage server service port, the default storage is 23000
port=23000
# Heartbeat interval time, unit: seconds (here refers to sending heartbeat to tracker server actively)
heart_beat_interval=30
# Number of storage paths, need and store_path number matching
store_path_count=1
# The following path of storage data and log must be created in advance
base_path=/home/hc/fastdfs
# If empty, base is used_ Path, set the same here
store_path0=/home/hc/fastdfs
#If this parameter is N only (for example: 256), then the storage server will run in store for the first time_ Automatically create N * N subdirectories to store files under path
subdir_count_per_path=256
# Configure the ip and port of the tracker monitored by the storage
#When there are multiple tracker servers, each tracker server writes one line
tracker_server=172.16.85.139:22122
# The period of time that the system is allowed to synchronize (the default is all day). It is generally used to avoid some problems in peak synchronization.
sync_start_time=00:00
sync_end_time=23:59
#Access port
http.server_port=80
```
3. Start Storage
```shell
# Method 1:
/etc/init.d/fdfs_storaged start
# Method 2:
service fdfs_storaged start
```
4. Check the port status: netstat -apn|grep fdfs

- Shut down Storage command:
```sh
service fdfs_storaged stop
```
- Restart Storage command:
```shell
service fdfs_storaged restart
```
5. Use monitor to check whether the storage is successfully bound and whether the communication between storage and Tracker is successful
```shell
/usr/bin/fdfs_monitor /etc/fdfs/storage.conf
```

6. Set the Storage boot
```sh
chkconfig fdfs_storaged on
```
## 6. Configure client
Modify configuration clinet configuration
```shell
cd /etc/fdfs
cp client.conf.sample client.conf
vi client.conf
Modify the following configuration
# Client's data and log directory
base_path=/home/hc/fastdfs
# Tracker port
tracker_server=172.16.85.139:22122
7. Install nginx
-
Download the Nginx package:
wget http://nginx.org/download/nginx-1.15.2.tar.gz -
Unzip nginx:
tar -zxvf nginx-1.15.2.tar.gz -
Enter the nginx directory
cd nginx-1.15.2 -
Depending on the NX installation package, you need to:
yum update

yum install pcre-devel
yum install zlib zlib-devel
yum install openssl openssl-devel

//The above three commands can be replaced by one of the following:
yum install pcre-devel zlib zlib-devel openssl openssl-devel
8. Install fastdfs nginx module installation package
-
Download fastdfs nginx module package
wget https://github.com/happyfish100/fastdfs-nginx-module/archive/V1.20.tar.gz # Unzip the installation package tar -zxvf V1.20.tar.gz -
Modify the fastdfs-nginx-module-1.20/src/config file
ngx_module_incs="/usr/include/fastdfs /usr/include/fastcommon/" CORE_INCS="$CORE_INCS /usr/include/fastdfs /usr/include/fastcommon/" -
Configure Nginx,
get into nginx catalog cd nginx-1.15.2 add module ./configure --add-module=/usr/local/src/fastdfs-nginx-module-1.20/src -
Recompile, install
make && make install -
Check nginx version, command:
/usr/local/nginx/sbin/nginx -V
9. Configure Nginx and fastdfs Nginx module modules
-
Configure mod-fastdfs.conf And copy it to the / etc/fdfs file directory
cd /usr/local/src/fastdfs-nginx-module-1.20/src/ cp mod_fastdfs.conf /etc/fdfs/ -
Modify mod-fastdfs.conf
vi /etc/fdfs/mod_fastdfs.conf Modify the following configuration: # Connection timeout connect_timeout=10 # The address of the Tracker Server tracker_server=172.16.85.139:22122 ## Whether the url contains the group name, set to true url_have_group_name = true # Storage configured store_path0 path, must and storage.conf Consistency in store_path0=/home/hc/fastdfs -
Copy the FastDFS unzip directory (anti-steal.jpg , http.conf , mime.types )Go to the / etc/fdfs directory
cd /root/libfastcommon-1.0.38/fastdfs-5.11/conf cp anti-steal.jpg http.conf mime.types /etc/fdfs/ -
Configure nginx, modify nginx.conf
vi /usr/local/nginx/conf/nginx.conf -
Add the following:
location ~/group([0-9])/M00 {
 ngx_fastdfs_module;
}
Note: in order to avoid the problem that the http request cannot be accessed due to the permission problem of nginx:

This step is very important. If you don't do this, the image will be uploaded successfully, but nginx in the browser cannot be accessed.
-
Start nginx
/usr/local/nginx/sbin/nginx -
Check nginx installation path:
whereis nginx
-
Set boot up
vi /etc/rc.local
Add a line:
/usr/local/nginx/sbin/nginx
# Set execution permissions
chmod 755 rc.local
- Query nginx version
/usr/local/nginx/sbin/nginx -V

10. Testing
-
Upload files
fdfs_upload_file /etc/fdfs/client.conf /home/111.png
-
View in nginx
-
View results in browser:

-
wget view results:

Source From: https://www.fatalerrors.org/a/boutique-centos7-and-fastdfs-build-image-server.html